How To Group Worksheets in Microsoft Excel: Steps to Follow
Whenever you work on multiple Excel sheets at a time, grouping them together makes the task easier. When you group Excel sheets together, you get the ability to implement changes to the same range of cells across multiple worksheets. In case you are wondering how to do it, this post has got you covered. Let’s get started.
Table of Contents
Grouping Worksheets in Microsoft Excel: Steps
How to Group a Certain Number of Worksheets in Microsoft Excel?
In case your Excel workbook contains varying data but has the same layout, grouping your sheets together is very helpful. In the example given below, three of the worksheets have lists of students for different classes, named “Class A,” “Class B,” and “Class C.”
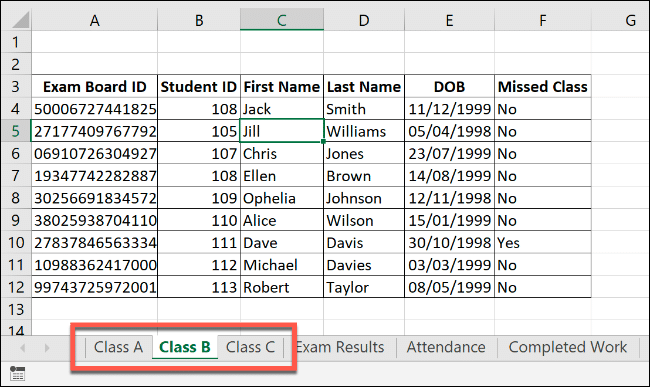
By grouping these three worksheets together, any action performed on a single worksheet will be applied to all worksheets in the group.
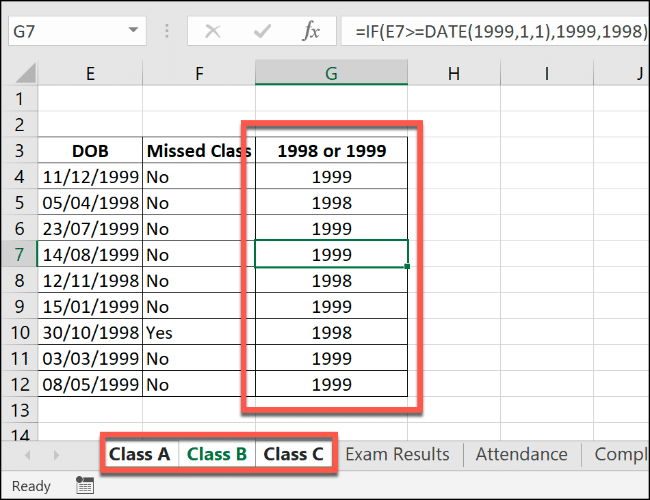
Let’s take an instance where we want to insert the IF formula in column G (cells G4 to G12) on each worksheet to determine whether any students were born in either 1998 or 1999. When the worksheets are grouped, the same formula will be automatically applied to the same range of cells across all three worksheets.
In order to group worksheets, go to the bottom of your Excel window and press and hold the Ctrl key and click each worksheet you want to group together.

After grouping, the grouped worksheets are displayed with a white background while the others continue being displayed with a gray one.
In this example, when the IF formula is inserted in the “Class B” worksheet, thanks to worksheet grouping, the same formula is automatically inserted in cells G4 to G12 on the “Class A” and “Class C” worksheets as well.
How to Group All Worksheets in Microsoft Excel?
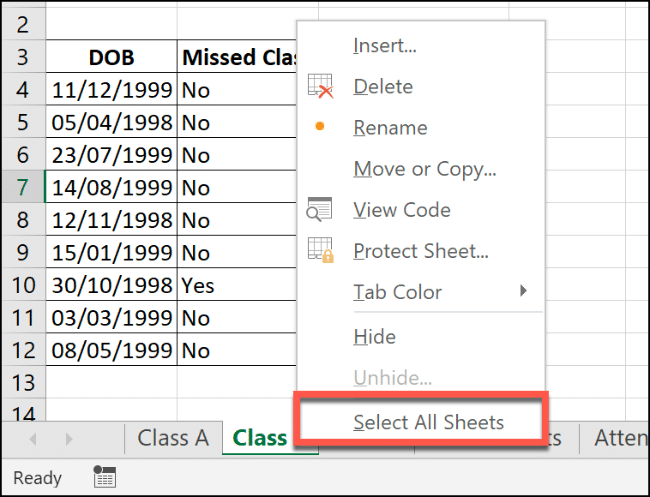
Pressing Ctrl and selecting individual worksheets works when you have to select a few worksheets in your workbook. However, if you want to select all of your workbook’s worksheets and group them together, you can do that too.
Just right-click on one of the worksheets listed at the bottom of the Excel window.
From here, click “Select All Sheets” to group all your worksheets together.
How to Ungroup Worksheets in Microsoft Excel?
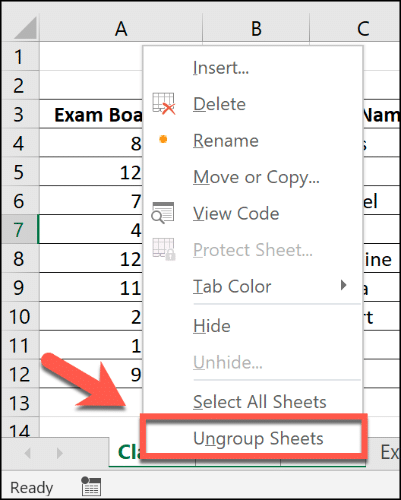
Once you finish applying all the changes to the grouped worksheets, you can ungroup them in two ways.
The fastest and most efficient method is to right-click a selected worksheet at the bottom of the Excel window, and click “Ungroup Sheets.”
In case you want to ungroup sheets individually, you have the option of doing that as well. Press and hold Ctrl and keep selecting the sheets you want to be ungrouped. After being ungrouped, the worksheet tabs will go back to the grey background from white.

