![Create A New Ad Account On Facebook [Complete Guide For Beginners]](https://nsouly.com/wp-content/uploads/2022/07/Create-A-New-Ad-Account-On-Facebook-Complete-Guide-For-Beginners-1.jpg)
Create A New Ad Account On Facebook [Complete Guide For Beginners]
How to create a new ad account on Facebook? There are almost 0 percent chances of an individual being unknown to the name: Facebook (Unless they are an alien). It is a social media platform that Mark Zuckerberg launched along with some of his college roommates for the students of Harvard University. Yet, the site is one of the most renowned social media platforms today, which has changed from its birth to now.
Today people use it for a wide variety of purposes. For instance, users can make new friends, react with older ones, play games with a squad, and, most importantly, use it as a marketing platform.
Running marketing campaigns on Facebook is a very effective and easy task that can be done in many ways. For instance, people conduct live sessions to make customers aware of their products, post content, and, most importantly, invest in Facebook ads. So, what are these Facebook advertisements? Do you need a separate account for this purpose?
Well! Don’t worry if you are also searching for answers to similar questions as we have covered for you. The forthcoming content will discuss the process to create new ad account facebook along with all of the must-to-be-known information you must know to reap maximum benefits from the Facebook advertisement. So, without wasting time, let us dig into the content. Please have a look.
Table of Contents
All You Need To Know About Facebook Ad Account
It is usually difficult for beginners to understand the complete information in one go. The same is why we have broken this article “Create new ad account facebook” down into several pieces to rest assured that you easily penetrate deep into each piece of essential information.
What Is Facebook Advertising
One needs to have a general overview before walking through the advanced information. So, Facebook advertisement is similar to any other visual ad you may have seen on social media sites.
For instance, have you ever seen those small clips that suddenly pop in between while watching a Facebook video? This is nothing else but an example of Facebook advertisements.
These ads are the best way to capture an audience as they provide you with the broadest exposure in the shortest possible time frame. In addition, these ads also play a vital role in bringing more traffic to your website through redirect links that are usually posted along with the ads. The users can use the Facebook business manager to manage their business on the platform.
What Is The Facebook Business Manager

Markers and business owners have always demanded Facebook create a tool that could provide them with ease to access client Facebook pages. And Facebook has finally answered their demand by launching a Facebook business manager. It is an online advertisement managing tool that enables marketers and agencies to create new ad account Facebook and monitor, control, and organize their ad accounts with one application. It helps them save a lot of time in setting up pages on the platform and provides visibility of who has access to pages.
In addition, it lets the advisor control all aspects of the business, including advertisements and modification of ages, with the ability to assign teamwork to them. Hence, you will now be able to analyze all the ad performance and move between pages without facing any difficulty.
The Facebook business manager also eliminates the fear of providing a Facebook profile login and personal email address associated with Facebook to any third party. Hence, you now don’t have to worry about sharing your profile as it is all safe and private.
Other types of Facebook users are also enabled to log in with their names. Providing a name is essential because it is needed for verification purposes. This hassle-free strategy has paved the way for providing clients with digital marketing companies for monitoring and maintaining pages and advertisements on their behalf.
Creating The Business Manager Account

You must create a business manager account before you create new ad account Facebook. Follow the below-mentioned step for this purpose
1. Browse Business Manager and click on the option that says “Create Business”
2. Enter your business name on the pop-up screen. Remember, when you roll out ads, this name will be shown to the audience. So, be careful with the spellings.
3. Enter the email address of yourself or your business to receive all the updates about the Facebook business manager.
4. You must provide essential business details such as address and website.
5. Lastly, go to the email address you have entered for confirmation. And that is it; you are all doing a business manager account.
Adding Account In Business Manager

A business manager allows you to add ad accounts and business accounts you don’t own ( accounts owned by other businesses and individuals). You can see the option of adding an ad account in the ad accounts section of your business manager’s setting. There, you will also get to see all of the accounts that are owned by you as well as those accounts that are owned by other people you have access to. If another business entity or another individual owns an account, you will see the name of that particular person or business who owns the account. It will be mentioned below the ad account name. However, if you or your business owns the account, you won’t see any additional information mentioned.
You can filter the settings in the following ways: Owned by self, Owned by partner, Active, Disabled, and Advertising for self. There are three ways to add ad accounts to a business manager. Let’s have a look at them.
Method # 1
Create a new ad account Facebook: New account belongs to the Business Manager who has created it. However, it can not be transferred to any individual who does not own a Business manager.
Method # 2
Add an ad account: Adding ad accounts moves it into the business manager. The same is why the creator must be both the ad account owner and the business manager’s admin for adding the ad account.
Remember that the account is permanently moved into the business manager once you add an ad account ( This action is not reversible). All the management must be completed within the profile of the business manager. In addition, you can not add an account that belongs to any other organization or individual rather than the business manager. Hence, if you still want to work on an account that belongs to a different business, you can always request its access.
Method # 3
Requesting access to an ad account: As we mentioned earlier, you can ask for access. And if you do so, The admin of that business manager can grant you permission to access and work on it. Hence, the whole thing depends upon your bond and relationship with the other person.
How To Add New Account In Business Manager
Adding an ad account to a business manager is not a difficult task. All you need to do is carefully follow the below-mentioned steps
Steps To Add Ad Account In Business Manager
1. Go to the setting tab of your business manager
2. Click accounts from the menu that you can find on the left side of the screen
3. Click on the section on Ad accounts
4. Click the blue Add drop-down menu
5. Now, you will be given a chance to choose from the available three options. Add an ad account and request access to an ad account. Create a new ad account Facebook.
6. You must enter the ad account ID if you request access or add an ad account.
7. Follow the prompts for accessing levels and selecting people
PS: you cant delete your ad account from the Business Manager by deactivating it. Instead, a deactivated account still counts towards your ad account limit.
How To Add The New Payment System To Your Facebook Ad Account
Follow the below-mentioned steps for adding a new payment method to your Facebook ad account.
1. Navigate to the setting tab of your Facebook ad account and go to Payment Settings. Here, you can edit your existing payment methods, add new payment methods, set and monitor your spending limits, and view your upcoming bill.
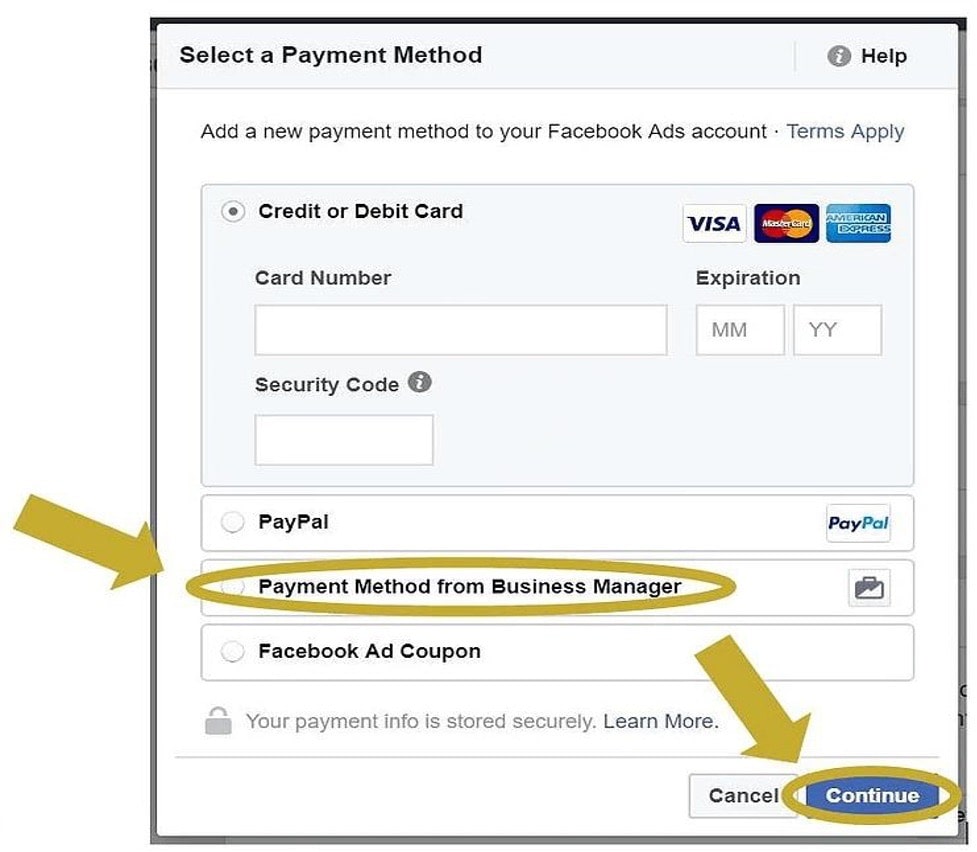
2. Now click on the option that says: Ad Payment Method
3. Select the payment method you want to add to your account. Various choices are available for the purpose, such as Credit card payments, Debit card payments, PayPal payments, Bank account payments (Only in supported countries), Facebook ad credit, or even Local manual payment methods.
4. Next, Facebook will ask you for some additional information. So provide accurately.
5. Click Next
How To Edit The Payment Method
As we mentioned earlier, you can also edit your current payment methods in the same tab. You can edit the payment method and select which one will be your primary payment method. However, you can not delete any of the preset primary methods.
Hence you have to select another option as the primary payment method before removing the first one.
How To Manage Notification Settings
Notifications are a critical aspect of Facebook and Facebook Business Manager that keeps you updated on all the current trends and latest information about your account.
However, you don’t want to flood your email with unnecessary notifications. So it is better to set your ad account notation frequency according to your needs and preferences. Here is how you can do it
1. Go to Business Setting in the Business Manager.
2. Select the Notifications from the menu on the left side.
3. Tick all the events you are interested in. be careful with this step as these will be all the areas of which Facebook will notify you via email and Facebook Push Notifications.
Adding People And Setting Permissions In Business Manager
Adding people is another step you must follow while setting up your Facebook ad account. It is vital because it allows you to grant your team members the access they need to work.
There were three possible ad account roles on Facebook: Admin, Advertiser, and Analyst.
How To Add Facebook Pages To The Business Manager
1. Navigate to your Facebook Business Manager and click “Business Setting” with the gear icon on the screen’s left side.
2. Select the “Pages” under the “Account” section on the menu.
3. Enter the URL of the Facebook pages you are admin off. Lastly, click “Add.”
How to add billing work on Facebook?

At this point, you would ask us: What is a Facebook ad billing, and why is it even necessary in the process of create new ad account Facebook? So, for those who don’t know about it, it is a crucial tool you need for advertisement management.
When you run advertising campaigns on Facebook, you need to set a budget for each ad you want to run on the platform. Once you have defined your total budget, Facebook will spend it evenly throughout the time your advertisement runs unless you have selected the option of Acceleration as the delivery type. Don’t worry; you will never get charged for more than the budget you have set. Hence, the amount of spending is totally in your control.
However, this preset budget is not the actual amount you will be spending. Instead, it is spent over a specific span based upon the budgeting option you have opted for.
Thus, the actual amount sent might be different from your budget. Are you feeling confused? Let us explain the case with the help of an example.
For instance, you have set your total budget of 100 dollars over one month. However, only 70 dollars have been spent by Facebook on your advertisement based on its performance. So, your total bill at the end of the month will be 70 dollars instead of 100. In this way, you can save a lot of bucks in the long run.
Types Of Budget
There are two types of budget you can go for: The daily budget and the Lifetime or total budget.
The daily budget is the average amount of money you are willing to spend each day. However, the Lifetime or total budget can be understood as the amount of money you are willing to spend over the total runtime of your advertisement.
Some Important Points To Consider
You must consider a few points before beginning with the adding account procedure to avoid any kind of unease in the long run.
1. Remember, Facebook allows its users only to add an ad account from their FB account to the Business manager. Nevertheless, you can create a new ad account in Facebook on the Business manager and request access.
2. You can not add an account to the business manager if any other person or organization has already added it. A single Business Manager can own one ad account. Understand this case with the example of Gmail. Have you ever seen an error that appears every time you try to take on an already-been-used Gmail username? The case is the same with the Business Manager: You can’t add an ad account that has already been added to the Business Manager.
3. You can’t add an ad account to a Business Manager if you have reached the maximum limit for adding new accounts to the application. There is no option available for requesting an ad account now. Plus, the ad account limits vary on the advertising spends of yourself.
4. Don’t forget that ad accounts are prepaid. Hence they can be added to the Business manager only if they belong to specific locations.
How are you charged
The following substantial question in the list is: What is Facebook’s process for charging me? Well, it is pretty simple. The Facebook pricing is solely based on an auction system. In this system.
Your advertisement competes with the method to your ad account when creating it. It is one crucial step, as the payment method other ads for impressions based on performance and bids. Hence it works on the PPC- Pay Per Click system. That means you only get charged when an individual clicks upon your advertisement.
When to pay? Now that you know how you get charged, it is time to let you know “How you pay. Firstly, you have to add at least a single payment. There are two primary payment settings for Facebook ads:
1. Automatic payment system: The platform charges you whenever you spend a specific amount as the billing threshold under an automatic payment system. Next, you will be charged on the monthly bill date for all the leftover costs incurred. The automatic payment system will work for you if you wish to pay your charges through PayPal, credit card, or debit card.
2. Manual payment system: under this form of the payment system, you add money to your account first rather than paying at the end of the month. Facebook deducts all the incurred charges once daily as you run your advertisement on the platform. This system will work for you if you are willing to pay your charges via PayTM or Boleto Bancario. With a manual payment system, you don’t have any billing threshold.
How To View Your Charges

Keeping an eye on the outflow of money is extremely important not to overspend your precious earnings. So, if you want to see your current spending on advertisements, you can have a look at an estimated daily spending limit; you can see it in the Ads Manager tab. All of such details are represented in the Ads manager’s billing section, including final charges.
However, do not forget that the amount of your final bill can always exceed your preset budget for any particular advertisement. It happens because Facebook charges you for all the advertisements you run on your ad accounts.
Moreover, the total number of clicks and impressions obtained by your ad is also shown in the Ads Manager tab. And the number of clicks and impressions you are charged for may differ from the number of clicks and impressions shown on your Ads manager tab.
How To Create Facebook Ads (Step-by-step)
Now that you know all essentials of Facebook ads and Facebook Business Manager, it is time to dive into the ad-creating process. So how do you create a Facebook ad?
Well, you will need the help of the Facebook ad manager tool. It is an exceptionally fantastic tool that lets the users create Facebook advertisement campaigns, manage their bids, and do market segmentation for selecting the accurate target audience. You can access this tool via your Facebook Business Manager.
After you have accessed it, you need to follow the steps below to create a successful advertising campaign.
Step 1: Create A New Facebook Ad Campaign
After that you are done with the process of create new ad account Facebook, Navigate to the Campaigns tab from the Facebook ad manager and click on the ” Create ” button. It would help if you found this green-colored button on the top left of your computer screen.
Step 2: Determine The Objective Of Your Advertisement Campaign
Next, you need to select your campaign objectives based on the needs of your business and its goals. Some of the available objectives are Exposure, Creating Brand Awareness, reaching a wider audience, bringing more traffic to the business, video views, clear generations, message conversion, store traffic, and catalog sales.
Be careful while choosing, as it profoundly impacts your available ad formats and bidding options. For initial startups, we recommend selecting “Brand Awareness” or Reach” as you may have no data and no meta pixel on the website. However, you can always select the “Conversions” after you have enough data converted to your advertising campaign objective.
Step 3: Give Your Campaign A Relevant Name
You have to select a unique yet relevant name for your campaign. It is one crucial task as it has profound impacts on various aspects. You can include different components of your advertising campaign in the campaign name, including the data range, creative type, target audience, location, etc.
If you are advertising for a client, you must include their name in your campaign title.
Step 4: Set Up The Budget And Bidding
You can define your campaign budget in two distinguished methods.
1. Daily budget is the total budget you are willing to send daily. Facebook usually spends about 25 percent more than your defined budget when it observes any high-potential opportunity.
2. A lifetime budget is a total amount you are willing to spend for the advertising campaign. Facebook divides this more or less equally within the tie span.
We recommend newbies and small startups to go for the option of a daily budget for running the campaign regularly. The daily budget does not have any end date. Hence they provide you with more control.
In addition, you can also set up the budget on the as-set level instead of setting it at the campaign level. The choice is all yours.
When talking about bidding, there are two options available for this as well: Manual bidding and Automatic bidding.
We suggest starting with the automatic bidding as it notifies Facebook to find the bids with a lower cost per conversion for your budget. Hence, it is best to stick with the default option (Automatic Bidding) until you acquire enough knowledge for your objective costs.
Nevertheless, once you have all the essential knowledge and experience, you can optimize your bids manually. Set the Cost Control via cost or bid cap to notify Facebook about how much you are willing to spend per bid. It is the best way to drive more conversions compared to automatic bidding.
The main difference between the bid cap and cost cap is flexibility. A cost cap is a bit flexible in seeing bids limit. Thus, Facebook is allowed to exceed the limits you have set earlier.
However, a bid cap is slightly more strict than a cost cap.
Step 5: Schedule Your Facebook Ad Set
The user needs to select the Facebook Advertising start date once the budget and bidding methods are set. You can also set an end date if you are willing to work on a time-sensitive idea such as the New Year Sale and Christmas Sale. For instance, you want your New Year sale to end on 2nd January. So, you can always set your end date: 2nd January, noon. And your campaign will end as soon as the clock reaches noon on that date.
The default start date of Facebook ads is immediate. Hence, do not forget to change it if you have any other reason for starting it later.
Step 6: Choose The Placement Of Your Advertisement
You can select the ad placement for your campaign manually. Or, you can also allow Facebook to do this task for you via the default “Automatic Placements.” Some of the popular Facebook placements are
1. News feed
2. Video feeds
3. Stories
4. Right column
5. Marketplace
6. Instant-Stream videos
7. Search results
8. Instant articles
Messenger placements
1. Inbox
2. Sponsored messages
3. Stores
Audience network placements
1. Audience Banner and Interstitial
2. Audience Network Rewarded Videos
Step 7: Selecting Your Target Audience
The success or failure of any business campaign solely depends upon its target audience. Therefore, you can either select any of your saved audience or may create a new one.
The platform supports you to target audiences through various possibilities such as interests and behaviors. Demographics, locations, and fans.
Also, you can create a custom audience on Facebook if you have installed Meta pixel. The users can also use the Customer list, which helps to target people who have shown interest in your videos in the past. Facebook also notifies you of your estimated daily reach and overall potential for reaching new audiences.
Step 8: Setting Up The Advertisement
Finally, we have reached the last step of this campaign creation process: The ads. At this stage, the users and creators can choose between two options: Using an existing Facebook page post and Creating a New advertisement. Hence select an ad format according to your wish and preference. The options include Carousel, Single Image, video, and the list.
After that, you are done selecting an ad format, and you now need to upload your ad creative. To do so, open the tab of the “Add Media” menu and select video and images. Lastly, check out your ad preview to observe any possible flaws.
When satisfied, launch your ad and Congratulations, you are all live with your first Facebook ad campaign.
Facebook Ad Account Troubleshooting

Although Facebook has done a great job with its advertisement accounts, some minor flaws may occur while trying to make your new Facebook ad account.
For instance, one common issue is users reaching their ad account limit to the maximum. As mentioned in the above content, a single business on Facebook can create a specified number of Facebook ad accounts. So, if you are one of those unfortunate businesses that have reached the maximum limit, you can resolve this issue by contacting a Facebook representative.
A second common issue is accounted being disabled. This issue can also occur to the best and most experienced advertisers, so don’t feel exhausted if it happens. Instead, focus on getting it resolved.
The first reason for this issue is that Facebook has found anything illegal or any aspect not aligned with the Facebook policy. So, we again recommend calling out a Facebook representative for help.
So how can you talk to a Facebook representative? The process is straightforward. Navigate to the Facebook help center and scroll until you see the “Chat option’. You must find it displayed next to the Contact our Support Team button. Click on it, and the representative will be there to talk.
Conclusion
On the bottom line, Facebook is a fun place to be. However, it is more enjoyable to use it as a marketing platform for conducting and running advertising campaigns.
Nonetheless, you first need to create a new ad Facebook through an application known as the Facebook business manager.
A Facebook business manager is a tool launched by Facebook to let users manage their business on the platform.
You can create your ad account on Facebook business manager in a few simple steps. After that you are done making the account, you need to follow eight simple steps to launch your very first ad campaign, which are as follows: creating a new Facebook ad campaign, defining the campaign objective, naming the campaign, setting up the budget, and budding, scheduling the Facebook ad set, choosing the ad placement, targeting audience, and setting up the final ad.
The content above contains in-depth information about all essentials. So, read the whole content carefully from start to end to successfully create new ad account Facebook. Rest, we wish you the best of luck for your next ad campaign.