
What is the Facebook Debugger and How Can You Use It?
When it comes to your Facebook posts, presentation is key. How you present everything – the images, the captions, and the links – goes a long way in building your brand’s image in the eyes of your customers. The problem is, sometimes Facebook’s auto-generated previews don’t come out right when you’re sharing blog posts or other content from your website. As a result of that, when you share a particular blog post on your Facebook page, it might generate a preview with a wrong title or image. That is obviously a huge problem. In case it’s a problem you have been facing often and have been hunting high and low to find a solution for it, this post has got you covered. In this post, we’re going to show you a quick and easy way to make sure that all your Facebook post previews look exactly the way you want them to. The key to solving the aforementioned problem is using a Facebook tool called the “Debugger”. Facebook Debugger is available for use on its developer site. The Facebook Debugger tool helps you with controlling all of the auto generated previews of your blogs/articles/website content. Even though it’s on Facebook’s developer site, you don’t have to be a full time professional developer to use it. Once you are done reading this article, you will be able to use Facebook Debugger with ease, without knowing anything about coding.
Table of Contents
Facebook Debugger: All You Need to Know
What is the Facebook Debugger?
Facebook Debugger is a free tool provided by Facebook which helps you with controlling how your blog posts appear to people when shared on Facebook. For any brand/website which has a Facebook page, the problem of shared blog posts and web page previews not appearing as intended is common. Hence, the Facebook Debugger is a very important tool. A straightforward example of the problem is Facebook “scraping” and displaying a random image from your article instead of the image that you want to be featured.
Facebook Debugger reviews any webpage very quickly and generates a preview that informs you about the reason it’s publishing previews a certain way. Then, you can use the information in its report to make changes to your HTML or tags to correct the problem.
How Does Facebook Select (“Scrape”) the Image and Caption for Your Blog Posts?
When someone visits your website and shares a blog post on Facebook, the shared post contains a preview that consists of an image and a caption.
Facebook previews include the following:
- Introduction
- Image
- Caption
The introduction is the message someone writes when sharing the post. When it comes to the image and caption, that job is done by a Facebook crawler. The image and caption are determined by a Facebook crawler. It does so by “scraping” through the page’s HTML and selecting an image and caption to be used when the post is shared on Facebook. After the Facebook crawler is done scraping through the web page, the information is stored in its cache for 30 days. If someone else re-shares the same post within that time, the crawler doesn’t scrape the page again. The post is re-published with the image and caption used originally.
A few things can go wrong because of this scraping process:
- Facebook crawlers might end up selecting a different image than the one you’ve chosen as the featured image.
- In case you update the post with new images or headings within 30 days of the first “scrape”, the Facebook preview might still show the old version of the post.
- Your Open Graph tags (og tags) might be set up incorrectly, leading to wrong image/captions turning up in the previews.
The Facebook Debugger comes really handy in this situation. And don’t worry, you don’t need to float some complicated lines of code to run it. Using the Facebook Debugger to test your page is as simple as entering your website’s address into the search bar. It will generate a report from that and you can analyze it.
How to Use the Facebook Debugger Tool
As we go through the steps of using the Facebook Debugger, it will be great if you can follow along by using the tool to debug one of your pages. It’s a significantly faster way to learn it. Let’s get started:
Step 1: Go to the Facebook Debugger Tool
The Facebook Debugger can be accessed by visiting the Sharing Debugger page. You can also navigate to Facebook for Developers > More > Tools > Sharing Debugger.
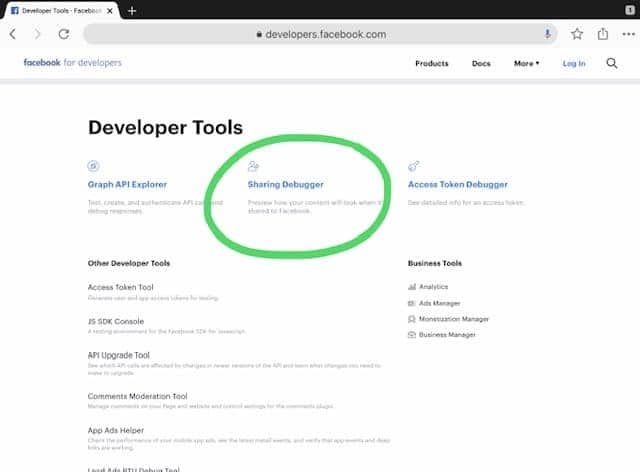
You will need to sign in to your Facebook account before you can start the process.
The page defaults to the Debugger tab, but if it’s your first time here, you should double check to make sure the “Sharing Debugger” is tab highlighted.
Now the tool is ready to use.
Step 2: Enter The Website Address Of The Page You Want To Test.
Go ahead and enter the web address of the page you want to review. You can review a post from your blog or any page from your website. Next, click “Debug” and wait for the results.
Step 3: Review Facebook Debugger Results
The Debugger works quickly. As soon as you enter your web page address and click “Debug,” the tool gets to work examining your web page and returning results instantly.
Here’s what a Facebook Debugger report looks like:
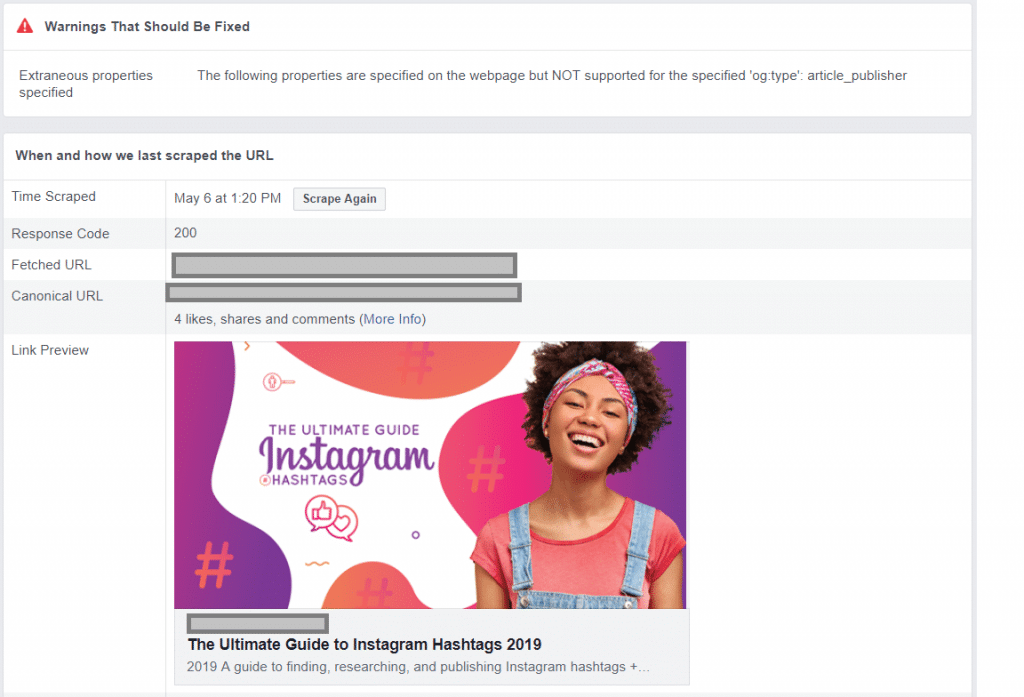
The top of the report, titled “warnings,” shows issues that need to be fixed on your page.
Next, it tells you when the page was last scraped and lists the fetched and canonical URLs.
It will also have a full preview that shows the appearance of your blog post/page when shared on Facebook.
Step 4: Clear the Caches
If your preview doesn’t show up the way you want it to, start by clearing your caches. It’s quite possible that the preview shows an old version because the Facebook Crawler stored an outdated version. You can clear the Facebook cache by selecting “Scrape Again” at the top of the Debugging report. If the preview still isn’t right, move on to the next step so you can adjust your settings.
Step 5: Adjust Open Graph Settings If Needed
In case clearing the caches fails to fix the preview issues, you will need to scroll down the Facebook Debugger report and analyze it a little more deeply.
The lower half of the Debugger report offers full details that your website’s back-end team can use to correct the problem.
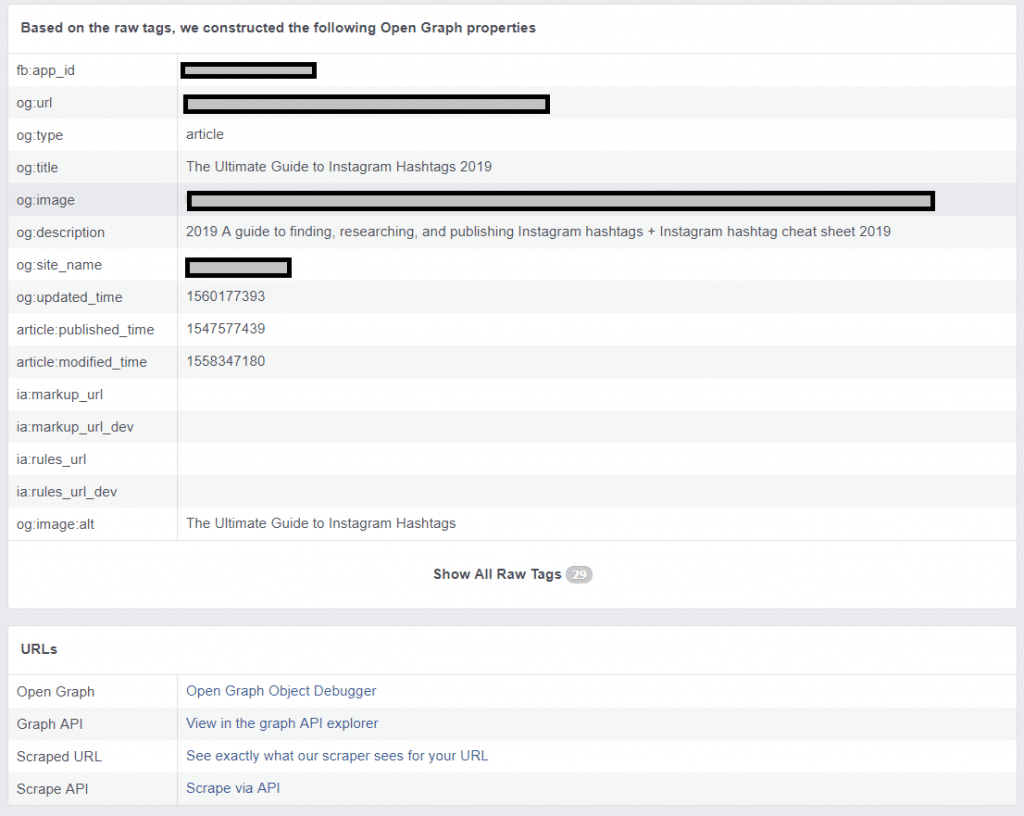
A persistent preview issue after cache clearance points towards something wrong with your Open Graph Tags (og tags).
What are og tags?
These tags are small pieces of code that are manually added to your webpage. are bits of code that are added to your pages manually. These tags help with integrating Facebook with other websites. Sites like Twitter and LinkedIn use og tags as well.
If you’re using WordPress, og tags can be managed through plugins like Yoast SEO or Open Graph for Facebook, Google+ and Twitter Card Tags.
Step 6: Re-run Facebook Debugger To Verify Changes
Upon successfully identifying and fixing the issues that caused problems to your previews, remember to clear your WordPress and Facebook cache once more before you run Facebook Debugger once again. The preview should now look exactly as you wanted.